Exchange Server 2003 can be configured to work with
other messaging systems that use SMTP for mail delivery. If you want to
configure Exchange Server 2003 to coexist with messaging systems for
which connectors are not provided, then you need to obtain third-party
gateways for these systems. Alternatively, if your organization already
implements Exchange Server 5.5, and an Exchange Server 5.5 connector
exists, you can create a mixed mode Exchange organization.
In the case of
Microsoft Mail, you can use Exchange System Manager in Exchange Server
2003 to configure a server running Exchange 2000 Server in your
organization as a directory synchronization requestor or server for
directory synchronization.
Exchange Server 2003
integrates with IIS to provide an efficient and secure environment that
allows users running Internet clients to access Exchange data locally
and remotely. This feature enables you to configure Exchange
interoperability with messaging systems that use SMTP for mail delivery.
You can configure global settings to customize default formatting
configurations and message size limits that are applied across every
mailbox and virtual server in your organization.
Exchange Server
2003 supports Hypertext Transfer Protocol (HTTP) and Web Distributed
Authoring and Versioning (WebDAV) to provide enhanced functionality for
HTTP clients retrieving and manipulating information in Web storage
systems. You can also configure an HTTP virtual server to support OWA,
and allow users to access e-mail, calendar information, shared
applications, and any content in the public folder store simply and
efficiently by using a Web browser.
Users with an IMAP4
client can access mail in their Exchange mailbox without downloading the
entire mailbox to a specific computer. Exchange uses Network News
Transfer Protocol (NNTP) to enable Microsoft Outlook users to
participate in online discussions over the Internet. Exchange also
enables users running client applications that support NNTP to access
newsgroup public folders on computers running Exchange.
Exchange supports
POP3 to allow POP3 users to access their private inboxes on Exchange.
However, the limitations of POP3 do not allow POP3 users to access other
public or private folders, and POP3 is not intended to provide full
manipulation of mail on the server. Although messages can be left on the
server, mail is usually downloaded to a user’s computer and then
deleted.
IMAP4 and POP3 clients
use SMTP for mail delivery. As discussed in the previous lesson,
Exchange Server 2003 can be configured to relay mail for these clients.
Configuring Global Settings
The Exchange
Server 2003 global settings feature allows you to configure system-wide
settings. This facility is useful, for example, when a majority of your
users may have similar message conversion needs or the same delivery
restrictions. You can define default formatting configurations and
message size limits that can be applied across every mailbox and virtual
server in your organization.
You can override
global settings for special messaging situations by configuring the
individual Exchange objects with different settings. Global settings are
applied only when no configurations have been made at the virtual
server level or at the individual mailbox level.
An SMTP virtual server
will not accept a message from a client or another server if the message
exceeds its message size limit. When a message is accepted, the SMTP
virtual server will try to deliver it to all recipient mailboxes. Only
then do global restrictions apply. All recipient mailboxes whose limits
are not exceeded then accept the message (mailbox limits can be set
globally or on a per-user basis).
Internet formats are used
when messages are sent to, or are received from, an Internet recipient.
When Messaging Application Programming Interface (MAPI) clients send
messages, these messages are converted from Microsoft Rich Text Format
(RTF) to MIME. Adding the MIME types of media or content that users send
or receive through e-mail to the list of MIME types helps recipients
open and display the attachment correctly.
A
domain node allows you to create a set of guidelines for SMTP to use
when sending messages to a specific remote domain. For example, if you
have MAPI clients that send messages to an associate company on a
regular basis, you can create a policy for SMTP to use when sending
messages to your associate’s domain. The policy allows you to specify
the format that your associate needs to use to view your messages. When
you add a domain node, you create a new set of SMTP guidelines to use
with a remote domain. This does not create a new domain in your
organization.
When you create a
domain node, you can specify the message format that SMTP should use
when sending e-mail. You can, for example, choose to use UNIX to UNIX
encoding (uuencode) instead of MIME.
Setting Message Defaults
Messages sent by
Internet clients are stored in MIME format, and no message conversion
takes place when clients read the messages. SMTP converts messages sent
by MAPI clients from RTF to MIME. You specify how SMTP converts outbound
messages sent by a MAPI client to an Internet client. You can associate
MIME content types with an extension to ensure that messages convert
correctly. You can also specify how all messages sent to a specific
domain are converted.
To set Internet
message defaults, you associate MIME types with an extension and
configure message defaults by creating a new SMTP policy, specifying
message formats, and setting advanced options, such as allowing out of
office responses, automatic replies, and delivery reports. These
procedures are described in detail later in this lesson.
Setting Mailbox Defaults
You can set message
size and recipient limits globally on the mailboxes in your organization
by accessing the Defaults tab in Exchange System Manager. Limiting
message size conserves system resources because larger messages are more
difficult to process and more likely to cause bottlenecks in the
Exchange routing engine. A message with many recipients can also tax
your system with directory lookups and delivery connections. Message
size limits can apply to inbound or outbound messages, or to both.
Recipient limits apply to all messages.
You may also want to designate a mailbox as the SMTP postmaster account. This is the account that will appear in the From line of all NDRs sent out by your organization.
Therefore,
whenever someone replies to an NDR, either to report the delivery
failure or to seek help in diagnosing the situation, this is the account
that will be contacted.
The Postmaster account uses an alias that will proxy replies to a valid SMTP e-mail address, such as [email protected].
You select the account of the user that has this responsibility in
Active Directory Users And Computers and select the E-Mail Addresses tab
in the user account’s Properties dialog box. You then click New, click
SMTP Address, and specify the alias in the E-Mail Address box on the
Internet Address Properties sheet
Supporting HTTP Clients
HTTP is the protocol
used by the World Wide Web to define how messages are formatted and
transmitted and what actions Web servers and browsers take in response
to various commands. WebDAV is an extension to the HTTP version 1.1
protocol. WebDAV allows an HTTP client to retrieve and manipulate
information held in the Information Store.
Exchange Server 2003 supports HTTP and WebDAV to provide the following functions for general data access:
Document access
HTTP and WebDAV support a collaborative environment in which users can
edit documents, protect data, collect resources in a common folder, move
or copy files, and modify file information.
E-mail access
HTTP and WebDAV can be used to access mailboxes and messages, to notify
users that new e-mail has arrived, and to allow users to move, copy, or
delete e-mail on the server.
Application access
HTTP and WebDAV are standards-based application layer protocols.
Mailboxes and public folders are accessed through a unique Uniform
Resource Locator (URL). This allows custom applications to retrieve data
directly from the Information Store.
You can create
additional HTTP virtual servers to provide for a number of different
collaboration scenarios. For example, you might want to use Integrated
Windows Authentication on the default virtual server, but also to
provide users outside your organization with information about your
company. In this situation, you can enable anonymous access on a
separate HTTP virtual server.
By default, users can access private mailboxes using a URL in the form of http://server_name/exchange/mailbox_name
after a standard Exchange installation and setup is complete. If you
create a new mailbox store, a different URL is automatically assigned to
it. This URL is based on the virtual directory name.
Virtual Directories
Virtual directories
provide users connecting to a virtual HTTP server with access to public
folders or mailboxes. For each virtual server you create, you must
define one virtual directory as the root of the server. The virtual
directory is used for publishing a public folder or mailboxes in an SMTP
domain. You can create additional virtual directories to publish
content not contained within the server’s own directory structure. The
virtual directory can provide users with access to a public folder or
mailbox on a local or remote domain.
When you create a
virtual directory, you provide users with access to the contents of a
public folder through a URL that takes the form http://virtualserver/public, where virtualserver
directory is the DNS name of the virtual server. You can also access a
published directory through Microsoft Internet Explorer or through any
client that supports the industry standard HTTP and WebDAV protocols.
You can use Microsoft Office to create and save documents directly into
an HTTP directory through a feature called Web Folders that lets you
work with files and folders that are on a Web server, just as you would
with files and folders in My Computer or Windows Explorer.
Outlook Web Access
An HTTP virtual server
is installed and configured during the Exchange Server 2003 installation
process to support OWA. You can use OWA to configure Exchange so that
users can access e-mail, calendar information, shared applications, and
any content in the public information store by using a Web browser. To
enable your users to access OWA from the Internet, your Exchange Server
2003 server must have an Internet connection, a public IP address, and a
registered domain name.
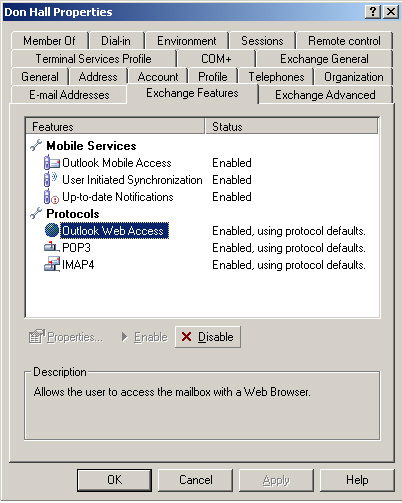
OWA can be disabled for
the Exchange organization by stopping the HTTP virtual server. It can
also be disabled on a per-user basis by accessing the user’s Properties
dialog box in the Active Directory Users And Computers console. On the
Exchange Features tab, you select Outlook Web Access, and then click
Disable as shown in Figure 1.
Supporting IMAP4 Clients
IMAP4
allows a client to access messages in private and public folders. IMAP4
clients can access mail in their Exchange mailbox without downloading
the entire mailbox to a specific computer. A single client can access
multiple mailboxes to retrieve specific messages or message portions,
such as attachments. IMAP4 clients can also search a mailbox and store
flags to identify messages that have been read.
You can create
multiple IMAP4 virtual servers on a single computer to handle multiple
local mail domains and provide administration for a number of different
messaging scenarios. You can configure your IMAP4 server to grant or
deny access to specific computers, groups of computers, or domains. You
can grant or deny access to a single computer either based on an IP
address or by overriding IMAP4 access on a per-user basis. A group of
computers can be either denied or granted access based upon subnet
address and mask. You can also control access to an entire domain by
specifying a domain name.
Configuring IMAP4 Clients
Before an IMAP4 client
can connect to a server, you need to create a mailbox-enabled user for
the client in Active Directory. You also need to configure the IMAP4
client with the account information it needs to allow it to connect to
the IMAP4 virtual server.
In
topologies that contain Exchange front-end and back-end servers, you
must configure the URL your users use to access calendaring information
on the Calendaring tab of an IMAP4 virtual server’s Properties box on
your back-end server. Exchange does not recognize any URL settings you
configure on your front-end servers.
To configure IMAP4
clients, you need to create a mailbox-enabled user, specify account
information on the client, and set per-user options. These procedures
are described in detail later in this lesson.
Supporting POP3 Clients
POP3 allows a client to
retrieve a specific user’s mail from the server. POP3 clients can
access only their server inboxes and cannot access other public or
private folders. POP3 is not intended to provide full manipulation of
mail on the server. Typically, mail is only downloaded and then deleted.
POP3 does not send e-mail; SMTP performs this function.
Both POP3 and IMAP4
allow clients to access their mail. The difference between these
protocols is where clients manipulate their messages. IMAP4 allows a
client to access and manage mail on a server. POP3 allows a client to
download mail from an inbox on a server to the client computer.
You can configure a
POP3 virtual server to grant or deny access to specific computers,
groups of computers, or domains. You can grant or deny access to a
single computer based on an IP address or by overriding POP3 access on a
per-user basis. A group of computers can be denied or granted access
based on their subnet IP address and subnet mask. You can also control
access to an entire domain by specifying a domain name.
When a POP3 client reads messages sent by a MAPI client, it converts them from RTF to MIME or uuencode.
You can view a list of
currently connected users. You can immediately disconnect a single user
from this list without disrupting the service of other connected users
or denying new connection requests.
Configuring POP3 Clients
Before a POP3 client can
connect to a server, you need to create a mailbox-enabled user for that
client in Active Directory. You also need to configure account
information on the POP3 client that allows the client to connect to the
POP3 virtual server.
Note
In
topologies that contain Exchange front-end and back-end servers, you
configure the URL that your users use to access calendaring information
on the Calendaring tab of a POP3 virtual server’s Properties dialog box
on your back-end server. Exchange does not recognize any URL settings
you configure on your front-end servers. If you use calendaring with
POP3 clients, then you must configure the POP3 client to keep a copy of
the message on the server. |
To configure POP3
clients, you need to create a mailbox-enabled user and specify account
information for that user on the POP3 client. If necessary, you can then
configure user-specific settings.
Allowing Clients to Send Mail
An SMTP virtual
server transfers data between Exchange servers. To allow IMAP4 or POP3
clients to send messages using SMTP, you need to configure an SMTP
virtual server to relay messages for these clients.
Supporting NNTP Clients
NNTP defines a set of client
and server commands used to access newsgroups. Exchange Server 2003
uses NNTP to enable Outlook users to participate in online discussions
over the Internet. Users running client applications that support NNTP
can also access newsgroup public folders on computers running Exchange,
and read and post items, such as messages and documents. Items in
newsgroups can be replicated to Usenet host computers through newsfeeds.
The Windows 2003 NNTP
service is designed to support a standalone newsgroup server, making it
easy to create group discussions. When you install Exchange Server 2003,
the NNTP service is enhanced with the capability to interface with
other news servers through newsfeeds. The NNTP service communicates with
external NNTP servers to make popular Usenet groups available to your
users.
An NNTP virtual server
allows you to administer newsgroup services by controlling
authentication and client connections from a centralized location. You
can create additional virtual servers to host multiple domains on a
single server, or you can create a public and private virtual server and
keep them separate for authentication purposes.
You can control which
articles are posted to a newsgroup by assigning a moderator to the
newsgroup. Articles submitted to a moderated newsgroup are not posted
until the moderator approves them.
Note
The
NNTP default virtual server and the NNTP service are disabled by
default. If you want to configure the default server, create an
additional server, configure newsfeeds, and define subordinate servers.
Then you must first enable and start the NNTP service in the Services
console. |
Practice: Message and Client Configuration
In this practice, you
configure the format of message extensions, create a policy for SMTP to
use when sending messages, and configure IMAP4 and POP3 clients. In
order to configure clients, you need to create mailbox-enabled users.
Exercise 1: Associate MIME Types with Extensions
When SMTP sends a MAPI
message to an Internet client, it assigns a content type to attachments
based on the extension of the attachment file. You can map a new file
extension to a specific type of content. You can also define your own
MIME types.
1. | Open Exchange System Manager.
|
2. | In the console tree, double-click Global Settings.
|
3. | Right-click Internet Message Formats, and then click Properties.
|
4. | On the General tab, double-click a content type.
|
5. | To change the content type, select a new content type in the Type drop-down list.
|
6. | To
change the extension, enter a new file extension in the Associated
Extension box. You do not need to include the “.” before the extension.
|
7. | To
map a new content type to an extension, select a new content type in
the Type drop-down list, and then enter a new file extension in the
Associated Extension box. You do not need to include the “.” before the
extension.
|
8. | Click OK. Click OK again to close the Properties dialog box.
|
Exercise 2: Configure Message Defaults
You can create a policy
for SMTP to use when sending messages to a specific domain. The policy
allows you to specify the format used by recipients in that domain to
view messages.
To set message defaults
for a domain, you need to create a new SMTP policy, and then specify
message formats and advanced options for that policy.
To create a new SMTP policy for a domain, perform the following steps:
1. | Access Exchange System Manager.
|
2. | In the console tree, double-click Global Settings.
|
3. | Right-click Internet Message Formats, point to New, and then click Domain.
|
4. | On the General tab, in Name, type a descriptive name for the policy, and then in SMTP Domain, type the DNS name of the domain.
|
5. | On the Message Format tab, in the Message Encoding section, select either MIME or UUEncode.
If you select
MIME, you can define how the message is formatted. To display text only
and replace graphics and active links with textual representations,
select Provide Message Body As Plain Text. To display graphics and links
to other documents, select Provide Message Body As HTML. If you are not
sure which format the client can read, select Both to provide both
plaintext and HTML. If
you select UUEncode, you can specify that you support Macintosh
clients. To use BinHex, which is an encoding scheme similar to uuencode
but is a more common format for Macintosh files, select Use BinHex For
Macintosh.
|
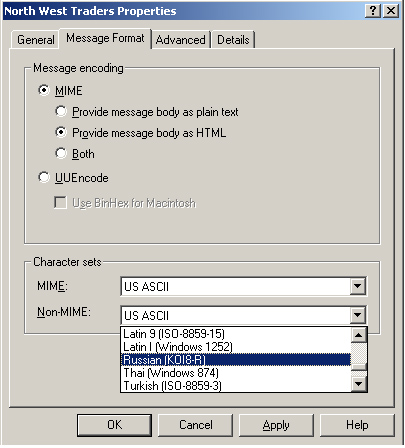
6. | To
support multilingual messages, choose a code page from the MIME and
Non-MIME messages drop-down lists in the Character Sets section. Windows
2003 uses code pages to read messages containing international
character sets. Figure 2.
|
7. | |
8. | If
you want to send all messages in RTF, then select Always Use. If,
however, you want to encode messages in MIME with HTML, then select
Never Use.
|
9. | If
you want to send text in the original format without forcing line
breaks, then select Never Use in Message Text Word Wrap. If, however,
your recipients have a limited area to display messages, or if you want
to reformat line breaks so that text flows no further than a specific
column, then select Use At Column, and type the number of the column.
|
10. | Select Allow Out Of Office Responses to notify the sender that the recipient is out of the office.
|
11. | Select Allow Automatic Replies to notify the sender that the message was received.
|
12. | Select Allow Automatic Forward to deliver a duplicate message to a different recipient.
|
13. | Select
Allow Delivery Reports to allow senders in the specified SMTP domain to
receive delivery reports when they send mail to your Exchange
organization.
|
14. | Select Allow Non-Delivery Reports to allow senders in the specified SMTP domain to receive NDRs from your Exchange organization.
|
15. | To
display the sender’s name as it appears in the Address Book, instead of
the shortened alias name used to route the message, select Preserve
Sender’s Display Name On Message.
|
16. | Click OK.
|
Exercise 3: Create a Mailbox-Enabled User
The Active Directory
Users And Computers console manages user objects such as mailboxes.
When Exchange System Manager is installed on a Windows 2003 server, a
set of extensions is added to the standard console. This allows you to
create an Exchange mailbox for user accounts.
You need to create
mailbox-enabled users for IMAP4 and POP3 clients. You should use this
procedure each time you need to create such a user. In fact, this is the
normal procedure for creating a user in Active Directory. When Exchange
System Manager is installed, new users are mailbox-enabled by default.
To create a mailbox-enabled user, perform the following steps:
1. | Open the Active Directory Users And Computers console.
|
2. | In the console tree, double-click the domain node, right-click the Users folder, point to New, and then click User.
|
3. | To create a user account, complete the New Object-User Wizard. Notice that Create An Exchange Mailbox is selected by default.
|
Exercise 4: Configure an IMAP4 Client
You use the previous
procedure to create a mailbox-enabled user account that the IMAP4
clients can use. When you have done that, you configure the IMAP4 client
with account information so that these users can log on to that client.
You then configure per-user options for any accounts for which the
server settings are not appropriate.
When you have created a
place to store user messages (that is, a user mailbox), you need to
direct the client to the appropriate server and configure the account
information so the user can log on. Because IMAP4 clients vary, the
process differs for each client; however, all clients must specify the
same type of information, as follows:
An IMAP4 account name This is the user’s alias in Active Directory, for example, d.hall.
An IMAP4 e-mail address This is the user’s Internet address and includes the alias followed by the domain name, for example, [email protected].
An IMAP4 server name Use the name of the Exchange computer hosting the IMAP4 virtual server or the DNS entry of the front-end IMAP4 server.
An SMTP server name
Because every Exchange server contains a default SMTP server, you can
use the same computer name as the IMAP4 virtual server host.
You may need to
override server defaults for specific clients. Suppose, for example,
that the majority of your IMAP4 clients can interpret HTML. Therefore,
you set the server to provide message bodies in HTML by default.
However, a few IMAP4 clients cannot interpret HTML. To provide plain
text messages for those clients, you configure their IMAP4 options on a
per-user basis.
Note
You
can also create additional virtual servers on a single computer to
provide administration for several messaging scenarios. This solution is
best suited for a large number of clients with varying needs. |
To configure an IMAP4 client and set per-user options, perform the following steps:
1. | Open the Active Directory Users And Computers console.
|
2. | In the console tree, click Users.
|
3. | Right-click a mailbox-enabled user in the details pane, and then click Properties.
|
4. | On the Exchange Features tab, click IMAP4.
|
5. | Click Properties. Figure 3 shows the Properties control.

|
6. | Click Use Protocol Defaults to clear the check box and configure client settings.
|
7. | You can now configure options for the specific user. Table 1 describes the available settings.
Table 1. Per-User IMAP4 Settings| Setting | Description |
|---|
| MIME Encoding | MIME
provides a way to describe a message consisting of different parts. By
definition, all IMAP4 clients are MIME-aware.Options include: | | | | | Default Character Set | Exchange
supports multilingual messages using Windows code pages instead of
Internet character sets. Most languages have a one-to-one correspondence
between the character set and code page. If multiple character sets
exist for one code page, then Exchange uses the character setting
specified on the Message Format tab. | | Use Microsoft Exchange Rich Text Format | If
this setting is enabled, then IMAP4 clients receive messages in RTF.
All IMAP4 clients receive the information as an attachment. If the IMAP4
client understands RTF, the attachment opens and displays as a normal
message. If the IMAP4 client does not understand Exchange RTF, then the
recipient needs to open the attachment manually. | | Enable Fast Message Retrieval | By
default, Exchange calculates the exact size of a message. To increase
the speed of message retrieval for clients that do not require exact
message size reports, you can enable the server to use approximate
message sizes. | | Include All Public Folders When A Folder List Is Requested | By
default, Exchange lists all public folders in response to the IMAP4
list “”* command. To improve performance for clients that have problems
listing a large number of folders, you can set this option to list only
the client’s private folders. |
|
8. | Click OK, and then click OK again to close the user Properties dialog box.
|
Exercise 5: Configure a POP3 Client
A POP3 client also
stores messages in users’ mailboxes, and mailbox-enabled user accounts
need to be created. When you have done that, you configure the POP3
client with account information so that these users can log on to that
client. You then configure per-user options for any accounts for which
the server settings are not appropriate.
When you have created a
place to store user messages (that is, a user mailbox), you need to
direct the client to the appropriate server and configure the account
information so the user can log on. Because POP3 clients vary, the
process differs for each client; however, all clients must specify the
same type of information.
A POP3 account name This is the user’s alias in Active Directory, for example, k.akers.
A POP3 e-mail address This is the user’s Internet address and includes the alias followed by the domain name, for example, [email protected].
A POP3 server name Use the name of the Exchange computer hosting the POP3 virtual server or the DNS entry of the front-end POP3 server.
An SMTP server name
Because every Exchange server contains a default SMTP server, you can
use the same computer name as the POP3 virtual server host.
You may need to
override server defaults for specific clients. Suppose, for example,
that the majority of your POP3 clients can interpret HTML. You therefore
set the server to provide message bodies in HTML by default. However, a
few POP3 clients cannot interpret HTML. To provide plain text messages
for those clients, you configure their POP3 options on a per-user basis.
To configure a POP3 client and per-user options, perform the following steps:
1. | Open the Active Directory Users And Computers console.
|
2. | In the console tree, click Users.
|
3. | In the details pane, right-click a mailbox-enabled user, and then click Properties.
|
4. | On the Exchange Features tab, click POP3.
|
5. | Click Properties.
|
6. | Click Use Protocol Defaults to clear the check box and configure client settings.
|
7. | You can now configure options for the specific user. Table 2 describes the available settings.
Table 2. Per-User POP3 Settings| Settings | Description |
|---|
| MIME Encoding | MIME provides a way to describe a message consisting of different parts. Options include:
| | UUEncode | Uuencode
converts a binary file into printable 7-bit ASCII characters without
loss of information. If you select uuencode, then you have the option of
specifying BinHex for Macintosh. | | Default Character Set | If multiple character sets can be used to convert a message, then a default character set is selected. | | Use Microsoft Exchange Rich Text Format | If
this is enabled, then POP3 clients receive messages in RTF. All POP3
clients receive the information as an attachment. If the client can
interpret RTF, the attachment opens and displays as a normal message.
Clients who cannot interpret RTF need to open the attachment manually. |
|
8. | Click OK, and then click OK again to close the user Properties dialog box. |